This guide outlines key processes for online collaborations if you are running a fully-online (or hybrid) Quantway or Statway course.
Note: If you are teaching a face-to-face Quantway or Statway course, your "collaboration" sessions will of course be conducted in class.
At the end of week 1, after establishing initial student groups based upon typical student availability, and conducting your Full Class Orientation sessions, your student groups will be eager to, and maybe a little anxious about, their first Collaboration session.
Over the first few student group Collaboration sessions, it is advisable to consider popping into the Collaboration session to assist your student groups with navigation, reinforce expectations, and to answer any questions. You can do this by navigating to the relevant collaboration session node and clicking the Join meeting button for any given student subgroup. Remember: Use the Join meeting button if you are just popping in to a collaboration session. As the weeks pass, however, student groups become more and more comfortable conducting collaborations, meaning that you can rely on the recordings and student group work in RealizeIt to provide feedback.
Some important points:
You can designate one student to be the leader of a student group for a particular Collaboration session, or you can leave it to students to self-select the leader role.
Only the student with the leader role has access to the Subgroup lesson (this is the Collaboration session material). The Subgroup lesson material is exactly the same as the in-class collaboration material in printed textbooks. After a leader starts their group's Collaboration session in Zoom, they will click the Subgroup lesson button to open the content. The leader will be sharing their screen with their group members as they work through the material.
Student group Collaboration sessions are recorded automatically. You will see a Recordings link beside the student group in the Collaboration node when the recording has processed (typically an hour or two after the student group finishes).
You can switch students from one group to another, but more often than not, students bond quickly and tend to want to stay in the same group for the duration of the class.
Note: Some instructors like to conduct the first Collaboration sessions as a full class session. For example, the instructor would first bring all students together for the Full Class Orientation session (where just one subgroup is created), and then also do the same thing for the first Collaboration session. If you do this, then the first time you'll be creating multiple student subgroups may be in Unit 1.2/Unit N.2.
Creating Student Subgroups for First Collaboration
Step 1. Launch into your the unit in which your students will be doing their first student group Collaboration session. This could be Working Together or Unit 1.1 (QW Core), Unit N.1 or Unit N.2 (QW College), and Unit 1.1. or Unit 1.2 (SW College). Click on the +Create subgroup button.
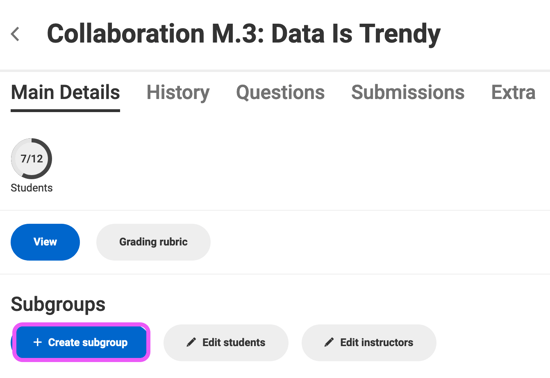
Here, you can assign the student subgroup a name (e.g. animals!). You can set the open and close dates to the start and end dates of your term. Clicking Save will then create a subgroup tile, as shown below: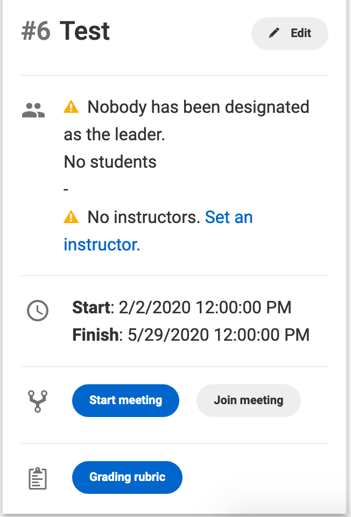
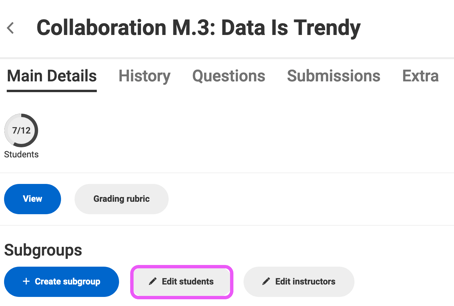
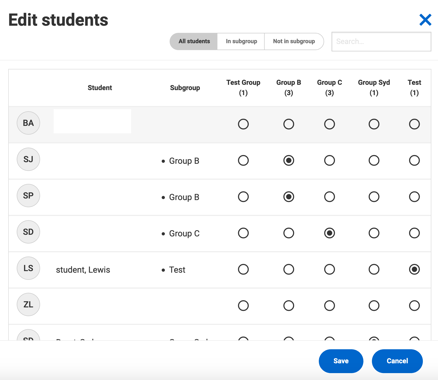
Step 2. Next, click on Edit students to select which students belong to this subgroup. You can also use the Edit instructors button to assign yourself as the instructor to the subgroup.
Step 3. Select the students to add to this subgroup, and click Save.
Step 4. Click on the Edit button to change the subgroup name. Make sure the start and end dates match the start and end dates of your term. In the Subgroup tile, you can also designate who the leader for the Collaboration session will be. The Grading rubric button is where you will go to assign the group a grade after reviewing their work. Grading collaborative work is optional. Any score given to collaborative work is not included in the unit grade calculation. You can also keep track of Collaboration session attendance by using the Mark participation button.
Step 5. Follow the above steps for each of your student subgroups for this first Collaboration session.
Note: When you have created student subgroups, you can use the Start/Join meeting buttons for each subgroup if you want to join the students in Zoom. Using the Start meeting button will make you the host of the meeting and should only be used when you yourself will lead the session. The Zoom meeting will end when you leave the meeting. Use the Join meeting button if you are just popping into a student subgroup meeting to check-in and/or provide guidance.
Student Subgroup Copying and Management
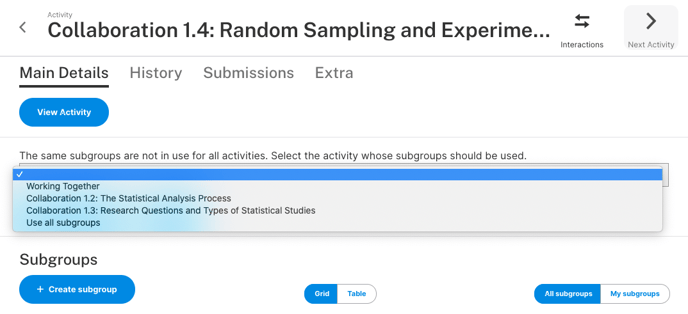
Subgroups have to be created for the Collaboration sessions in each unit, but once you have created your initial groups, when you go into a subsequent Collaboration node (e.g. you've created your initial student subgroups in, say, Collaboration 1.2 and you go into Collaboration 1.3), you have options to copy previously created student subgroups.
When you click Create subgroups in a collaboration subsequent to the one in which you initially created student subgroups, the groups will automatically be created. If there is some variance in student subgroups in previous collaborations, after clicking Create Subgroups, you'll be given the option to select from a drop-down which previously-created subgroups to copy. Note that the drop-down selection option is only presented when there is variation in previously established student subgroups.